Key Takeaways
- Tape measures are more complex than they seem. From fractional markings to black diamonds, each feature has a purpose that can impact your project’s accuracy.
- The sliding hook matters. It compensates for inside and outside measurements by shifting 1/16", helping ensure accurate readings.
- Consistency is key. Always use the same tape for a project — different brands (and even different tapes of the same brand) can vary slightly.
- Use the tape case in your measurement. Many cases include their length stamped on the side — add that when measuring between two surfaces.
- Self-centering tapes simplify finding midpoints. Ideal for balancing wall hangings or dividing space quickly without math.
- Measure smart, not fast. Always double-check, account for saw kerf, and avoid letting the tape slam back—accuracy starts with care.
Happy to bring you another gem from our NoCry PDP community! Our member Bill Young dives deep into an essential tool we all use but may not fully understand: the tape measure.
From practical tips and fascinating features to little-known tricks that can save your project (and your sanity), this guide compiles his wisdom to help you get the most out of this everyday tool.
Read on to learn from one of the best, Bill Young.
The Tape Measure, The Everyday Hero

A tape measure, while seemingly simple, has many features and details to be aware of. Even if you are not a master carpenter, you’ve likely had a tape measure in hand. You always seem to need to measure something such as dimensions of a window or whole room. How about measuring a piece of furniture to see if it will fit before your better half has you move it just to see!
How about finding the center of a curtain rod or picture you are adding a bracket to so it will hang on the wall? Ever tried to put many pictures on the wall and get everything balanced and in line?
Tape measures help with this. In the United States we use inches and feet called the Imperial system. I am almost 70 years old but had to learn the metric system in school along with the Imperial system. Metric seems so much easier to do fractions! I wish many times we had adopted that system. But, I will continue with the Imperial system in this article.
Imperial vs. Metric

The photo above is Imperial, Imperial with fractions shown, and the bottom is Imperial with Metric. You know how challenging adding, subtracting and dividing fractions can be…especially working with a master cabinetmaker who only completed 8th grade but could do fractions faster in his head than I could scribble on a box or board to find the answer. I never understood his method of math but it was always right on target. Cabinet makers have no tolerance for joints that don’t fit.
So, here came lesson number one: The cut man (the one with the saw) had to use the same tape measure as the person calling out the measurements. Why would that make a difference?
I have found that measurements differ from one tape manufacturer to another. Even within the same brand, two tapes measure differently. How can that be?
The ends of the tapes have a metal “hook” that slides slightly to ensure accurate measurements when measuring inside or outside surfaces. You have to compare two seemingly "exactly the same" tapes side by side to validate measurements inside and outside surfaces. I cringe when someone presses the release button and lets the tape slam back into the frame. The only stop is that hook at the end. Every time you do that, it gets a little looser.
So, your accuracy suffers especially when your cut man and installer must have the exact same length after the cut is made.
The Sliding Hook
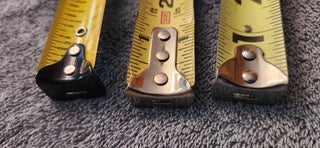
Also, notice the notch on the bottom of the hook that is on the towel in the picture. Why is a slot in that hook? So you can drive a nail at one end of the project and place the hook’s slot over the head of the nail to measure a longer distance when you have no one there to hold the end of the tape for you.
You may have also noticed the metal hook at the end of the tape slides in and out a bit. The hook is not loose but is made that way. The first Inch of the tape is short by 1/16”, yes it is true. The first Inch of the tape is not really an Inch. The tape’s sliding hook and 1/16” of and inch truncation creates a “true” measurement whether inside or outside of the surface being measured.
To measure the inside of the surface, like a picture frame or door, you want to count the hook thickness in your measurement. Amazing but true. Everyone loves to push the button on a fully extended tape measure to watch and hear it zip back into the casing. Only now you know to put a hand on the tape as it comes back in to stop the “slam” that can alter your measurements.
Before I forget…you can hook the end of the tape to the head of a nail and put a pencil at the opposite side of the tape moving your hand around in a circle and marking that perfect circle with the tape (provided you locked the tape at the desired length and keep to pulled tight).
Extra Features: Nail Slots and Black Diamonds

Do you see the black diamond just past 19? Every 19.2”, you will see this on most tape measures. If you want to achieve equal spacing for 5 framing members within an 8’ span (most carpenters like to put five trusses per 8 feet, so the sheathing over the framing is stiffer) these are handy markings: 8 feet = 96”, so that if you place 5 studs equally spaced apart you would place them every 19.2”.
So why is the 16” and every other multiple of 16” red? Framing studs and some floor joists (some are 24”) are spaced 16” on center. That means the center on one stud to the center of the next stud is 16”. While this feature is vital to framers and drywallers, it comes in handy for the average person trying to mount a bike rack or TV on a wall. If you know where the center of one stud is, you can mark the location of the others… provided your framer was good with a tape!
Framing Fundamentals

Let’s say you need to measure the length of an interior wall. The end of the tape is pressed against the far wall but then the tape measure case is pressed against the other side of the wall. How do you factor the width of your tape measure case in the total measurement?
If you look at the back of your tape near the bottom you will see some engraved lettering that shows 3” (differs from tape to tape) as in the picture above. Add 3 inches to your tape reading to arrive at the total. If it shows 93”, add 3” for this case to total the width of the room as 96” or 8 feet.
If you are measuring the height of a wall, it’s easier to place the hook on the floor and press it against the wall with your toe. Extend the tape up and eyeball the measurement.
Self-Centering Tapes: A Game-Changer

Many times I find the need to locate the center of a project I am working on. I find this self centering tape to be invaluable. Look at the black 9” and just below in red is 4 1/2”. Look Ma, no calculator needed!
It becomes even more valuable the longer and more non-standard length you are working with. I am not ashamed to say I use this more often than I would have ever thought. It just comes in handy many times.

So the 30’ tape just won’t reach you say. Ok, the orange pocket model works for up to 100’ as well as the crank up model with the large handle. I have used these outdoors on projects not requiring cabinet maker precision but still needs accuracy.

Let’s say you would like to do a project on a larger scale. I have used this for estimating roofing, fencing, square footage estimates for pest control chemical application and lot sizes. If you ever need to draw the perimeter of a house on graph paper, this is your tool of choice.
Trust but Verify: The Importance of Double-Checking
Moving on to more ideas. If you need to measure a round object, use a piece of string or fabric tape. Stretch the string around the object mark where it ends, then lay it along a tape to get the measurement. If you are the cut man on a project, factor in the saw kerf in your cuts. I use a laser on my sliding miter saw to allow precise cuts that don't have the be lined up by eye each time.
Never trust factory edges. Just because it says it is a certain size, double-check. In our world today, sheathing and plywood are coming in strange thicknesses that can really throw a project off if you aren’t aware.

Best Tape Measures
Here are some great tape measure options that offer excellent quality and utility.
For general use:
This tape measure features double-sided markings. It's a perfect choice for left-handed and right-handed users. Also includes easy-to-read fractional increments for DIYers and professionals alike.
For easy handling:
The self-locking mechanism makes it convenient for one-handed use, and the compact design is ideal for general home projects.
For precision:
These tape measures offer superior accuracy with smooth retraction and a durable build. Great for projects requiring exact measurements.
For professional use:
Combines the functionality of a tape measure with a chalk line reel, making it perfect for marking large areas or unusual angles.
For DIY:
This is an affordable option with a lightweight design, which makes it great for quick DIY projects.
Conclusion
A tape measure is more than a tool — it’s your project’s first line of precision. Whether you’re framing a wall or centering a photo, understanding how to read and use your tape properly can save time, money, and frustration.
FAQ
Is there a difference between cheap and expensive tape measures?
Yes. Expensive tape measures often have more durable materials, better locking mechanisms, clearer markings, and smoother retraction. Cheap ones may wear out faster or provide inaccurate readings over time.
What are the black diamonds on a tape measure for?
They mark 19.2" intervals, used in framing to evenly space five trusses over 8 feet.
Why does the hook on my tape measure move?
The hook slides to account for its own thickness, making measurements accurate whether you're measuring inside or outside edges.
What’s the number printed on the tape case for?
That’s the case length. Add it to your tape reading when measuring between two walls to get the full dimension.

